Standard: This is your basic cut. It’s literally putting two clips side by side. You’ll most likely use this more than any other kind of cut.
J-Cut: A J-cut offers a smooth transition from one shot to the next by having the audio of Clip B play at the tail end of Clip A. In other words, as you watch the first clip play, you begin to hear the audio from the next clip before you see its visuals.
L-Cut: It’s a J-cut in reverse. Instead of transitioning into Shot B with Shot B’s audio, you’re transitioning with Shot A’s audio.
Cross-Cutting: Also known as parallel editing, this technique can get a little hairy if you’re not careful, mainly because what you’re doing is editing two different stories so they play side-by-side. You see this all the time in action movies.
Jump Cut: Jump cuts consist of taking one of your longer clips, cut bits and pieces out of it, and put the fragments you want to include in your timeline back together. It’ll look like the clip is “jumping” around through time.
Cutting on Action: To put it simply, Cutting on Action just means cutting in the middle of your subject’s action, whether it’s a punch, a head turn, or even someone reaching for a doorknob in one shot and then opening the door in the next. Mastering this cut is crucial because it helps hide edits that occur during an action.
Match Cut: On a technical level, it’s a standard cut (from one shot to another). However, what makes it special is how it matches the similar actions of both shots.
Cutaways: These kinds of cuts are helpful if you want to add shots that give more information and context to a scene, like shots of the location to establish the setting or shots of props and other objects that a character is referring to. Because many editors use them to incorporate supplementary footage, it might be helpful to think of cutaways as “b-roll cuts.”
Montage: Montage is a film editing technique in which a series of short shots are sequenced to condense space, time, and information.
To import media into premiere pro you must first select to open a project or create a new project, once you have done that you will be opened to the premiere pro create window.
From there, click on “File” at the top right corner of the screen and then click on “Import” (or use Ctrl + l).
This will then open up a browser of your files that you can proceed to search and open any of your files with.
Once you have selected your file, the video should appear at the bottom left of the screen. Double click on it and it will appear on the source window, then get to work!
To create a new project you first must start up the premier pro application, you will introduced with this window with the following options, you then click on new project.
Once you start up a new project you get a lot of options, just make sure to give your project a title and then choose a saving location and make sure that it has enough space for it to be saved there.
As soon as you create the new project it will appear like this, from here you are free to create any type of content you want.
Lighting is a fundamental to film because it creates a visual mood, atmosphere, and sense of meaning for the audience. Whether it’s dressing a film set or blocking actors, every step of the cinematic process affects the lighting setup, and vice-versa.
Lighting tells the audience where to look. The lighting setup guides the eye to a specific actor, prop, or part of a scene.
Lighting reflects the psychology of characters. The amount, size, color, and harshness of light surrounding a character can be adjusted to match their emotions.
Lighting defines and supports the genre of the film. Lighting is the tool that conveys mood most clearly. For example, one of the film genres most known for its distinct lighting style is film noir, characterized by stark contrasts between light and dark, dramatically patterned shadows, and unique framing and composition choices.
Who Determines the Lighting Setup for a Scene?
The director shares visual inspirations and ideas for cinematic lighting.
The director of photography or cinematographer: creates the lighting plan with input from the director.
The gaffer designs and executes the cinematographer’s lighting plan and oversees the crew that brings the lighting plan to life.
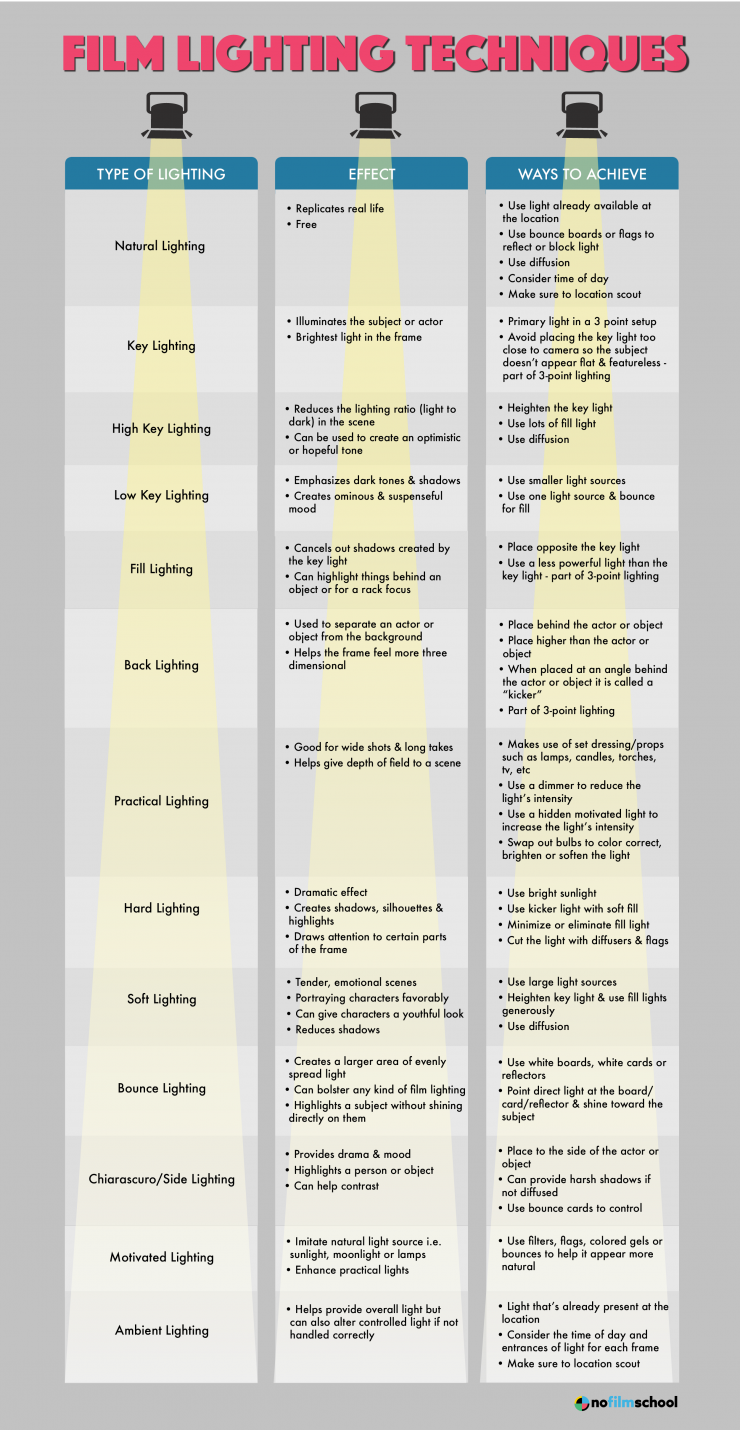
There are 12 basic types of lighting used in filmmaking:
Key lighting is the main—and strongest—light source in a scene or on the actor.
Fill lighting adds dimension and softens harsh shadows created by the key light.
Backlighting is placed behind the actor to help define their features and distinguish them from the background.
Side lighting lights the actor from the side and focuses on the contours of their face for a high-contrast dramatic effect.
Practical lighting is a light source that is visible within the scene like lamps, light fixtures, candles, and television sets. They’re not usually strong enough to light a subject, but they add to the cinematic ambiance of the scene.
Hard lighting is a lighting aesthetic with harsh shadows that draws attention to a specific actor or part of a scene.
Soft lighting is a lighting aesthetic with little to no harsh shadows that’s bright yet balanced.
High-key lighting is a lighting aesthetic with no shadows and intense brightness, bordering on overexposure. You’ll commonly see high-key lighting in a television sitcom, a music video, or a commercial.
Low-key lighting is a lighting aesthetic with a lot of shadows to create a sense of mystery or suspense.
Natural lighting uses and modifies the available light at the location of the shoot.
Motivated lighting is a controlled lighting technique meant to imitate natural light sources in the scene like the sun or the moon.
Bounce lighting is a technique where light is bounced from a strong source toward the actor with a reflector, which soften and spread the light.
Here are a few helpful tips for picking a film location:
1. Interior Locations
Shooting in a tiny location can be a nightmare. There’s no place to stage your equipment in any organized fashion, costing you time when hunting for something as simple as the slate or a roll of gaff tape. In addition, it’s almost impossible for the crew to work efficiently without getting in each other’s way — sometimes all non-essential crew need to leave the set to avoid being in the shot!
Tiny locations often result in actors not having a quiet space in which to change clothes or concentrate on their lines. Lastly, the added chaos can often result in needless mistakes and miscommunication.
So make sure you have adequate space for your scene and have each department designate a part of the location as their space. Your AC should have a clean and quiet place to store lenses and upload footage. The lighting department needs space to organize their lights, cables and accessories. The same goes for almost every department. Organization will always pay off dividends when you’re under time pressure.
2. Exterior Locations
Shooting outdoors presents its own set of difficulties.
One common mistake has to do with noise. Filmmakers unfortunately have a habit of turning off their ears when scouting a location. Later on they return to shoot and find out they’re in the flight path of an airport or there’s the roar of a highway just a few blocks away. You may not hear the noise when you’re scouting, but the microphones do. This can vary depending on the time of day, so scouting your location during the same time of day that you plan to shoot is critical.
This obviously goes for the direction and quality of the sunlight as well. Your location might have looked great at 1 p.m. when you scouted it, but at 9 a.m., you’ll discover the sun is backlighting all your shots and making it impossible to get an exposure. Finally, it is critical during scouting to find convenient facilities nearby, so cast and crew don’t have to travel several blocks looking for restrooms or changing rooms. And if you’re really on top of your game, listing the nearest hospital is a simple way to safeguard your shoot in case of emergencies.
3. Interior/Exterior Locations
When shooting on private property, permits are not required — just permission from the location owner or legally designated manager. But you may still need to notify local law enforcement. On more than one occasion have robberies and other crimes been acted out from the script without any warning given to local authorities. Sometimes pedestrians see the robbery but not the camera or crew and call 911, and police will burst onto a set ready to stop a crime that’s not really happening. In this case, notifying the proper parties isn’t just good filmmaking — it’s an issue of safety.
4. Permits
If you’re using small, lightweight equipment, chances are you don’t need a shooting permit when filming on public streets. However, if you are blocking traffic, limiting access to a business, staging an action scene or a scene of violence, you may need to only acquire a shooting permit from the local government.
Many inexperienced filmmakers are intimidated by the process of acquiring permits simply because they’ve never done it before. But once you’ve obtained a permit, you will find that it’s not so bad at all, and will make you feel much more secure on set. In many cases, parking permits come with it, allowing you to park your vehicle in convenient places outlawed to the general public. Finally, as mentioned above, notifying local law enforcement officials will prevent scary misunderstandings.
5. Company Moves
If you’ve worked on a few shoots, you’ve no doubt discovered that the most time consuming part is moving from one location to another. Nothing is more frustrating than being stuck in traffic when you’re already behind schedule. This is why one of the most important aspects of the assistant director’s job is to schedule locations in close proximity to each other. Once a film’s most important location is found, it’s not uncommon to schedule everything else for that day somewhere in the vicinity.
6. Authenticity
Few things can ruin the illusion of your film more quickly than a location that’s not authentic-looking. If your scene calls for a hospital set and you’re hoping that your apartment is going to be a credible substitute, forget it. No one’s going to buy it.
If you need to be, be flexible in your script. Perhaps the patient is being treated at home. Perhaps the scene can be rewritten and staged outside the hospital. Or maybe the scene can be shot in a space that passes for a visitors’ lounge. Although you may not wish to compromise your vision, it’s not going to help your story if a fake-looking location takes the audience out of the moment.
7. Resourcefulness
While the above statement is true, it doesn’t mean finding a real hospital is impossible — if you put the time into researching locations and do the legwork of checking each one. I’ve been astounded at the hard-to-get locations film students have acquired simply because they made the effort to check out all possible alternatives. This includes not only hospitals but airport terminals, train stations, courtrooms, farms, castles, you name it.
If you need a specific location — a bar, for instance — and you wait until the last minute, don’t be surprised if the owner takes advantage of your desperation and charges you through the nose. On the other hand, if you take the time to check 10 or 20 bars in advance, the odds are good that you’ll find at least one cordial owner willing to let you shoot there for free.
8. Courtesy
Even though you may have gotten the location owner’s permission, there’s little to stop them from changing their minds at the last minute — if you give them a reason to. Most location owners are nervous about inexperienced filmmakers damaging their property. So it’s always a good idea on the day of the shoot, before you start dragging your equipment through the door or moving expensive and delicate furnishings around, for the director to enter the location and assuage any of owner’s fears, reassuring them that the crew has been directed to treat the location with the utmost respect.
If something needs to be moved, ask the owner to move it or to supervise you moving it, so they see that you are going to treat their location as if it were your own. If you have heavy gear, like dollies and C-stands, it’s not a bad idea to lay down paper to protect the floor. And beware of putting tape on the walls and wooden floors. You don’t want to have to pay to have an entire parquet floor refinished because you peeled off a small strip of varnish. Location owners may oblige you if you’re courteous, but they’ll never cooperate if you’re rude.
9. Thinking Creatively
You may have two houses in your script but that doesn’t mean you need two locations. The same house may be used for both locations, provided you don’t have to use the same room twice (although even this can be done with a bit of creative set dressing and a can of paint). The same goes for two restaurants, two apartments, two offices or any other duplicate location. In fact, with a little creativity, even the dining room can be dressed to look like a restaurant. This works especially well if the scene allows for lots of close-ups.
With a bit of creative lighting and blocking, you’d be amazed what you can pull off.
10. Location Photos
When scouting locations, it’s a must to bring along a camera. Take shots from all different perspectives and try to remember to shoot a panorama if possible. This is very helpful, especially if you’re showing the location to someone who hasn’t been there before. A panorama can tie together all your individual shots, in a way that makes the geography more comprehensible. It’s also not bad idea to take video these days, considering many of us carry around 4K cameras in our smartphones now.
11. Unexpected Contingencies
No matter how well you plan, there’s always the chance that something unforeseen is going to happen on the day of your shoot. Maybe a water main breaks and now a construction crew is making a racket outside your set. Or someone is mowing their lawn a block away and it’s ruining all your dialogue tracks. Road construction could be blocking the vehicle carrying your actors to the set. There’s a transit strike. A delivery truck parks across the street during your scene and now your shots won’t match with what you shot earlier. The list is endless.
Of course you can’t anticipate everything, but there are some things you can investigate the night before or even the morning of your shoot. Check the weather forecast. Check travel alerts and road conditions in your area. If your city has a main energy provider, like Con Edison, they probably have a website where street work is listed, so check those, too. And in the case of a noisy lawnmower or a unsightly truck, remember #8: always be courteous. Sometimes asking nicely is all it takes to save the day.
In Summary
Picking the right film location can be complicated work, which is why you must plan and budget it correctly, and as early as possible in the pre-production process. As soon as the script is approved, begin the research and the process of filing for permits. At the same time, be ready to compromise and improvise, and try to find a balance between the two. Make the best use of your resources. If you follow these suggested tips, you’re sure to come up with something that suits your artistic vision as well as fits your budget.
Great dialogue is one of the great pleasures of the movies, and it’s often one of the most memorable elements of a film. Here’s why:
– Like the scene itself, dialogue has several specific functions in the screenplay. Its primary function is dramatic, that is, to carry the story forward. Characters speak because they need something and saying something will help them get it. In practice that’s never as simple as it seems. It may seem counterintuitive, but the actual purpose or goal of the scene is frequently the one thing that cannot be said aloud. The character pursues the many steps that lead to that goal, rather than stating his or her intentions. The character needn’t say any more than necessary, as we frequently talk around important issues that are too sensitive to discuss. As in real life, language is often a way to displace or deflect the emotion of a scene. And what’s not said is often as important as what is.
– Dialogue will reveal character, both in what is said and how it’s said. The dialogue will reveal immediate needs and desires, but it also reveals background, education, social class and a host of other attributes. The interplay between the characters will reveal their relationship and power balance.
– Dialogue can be used to carry expository information necessary for the audience to understand the story.
And it all must happen in a dramatic context. These last two functions can be especially tricky, as the story cannot stop to allow the writer to expound on his themes or explain details of the story. We notice immediately if the writer is speaking, rather than the character.
Good dialogue can do all of these things simultaneously. It will sound natural and give distinct voice to each of the characters. Great dialogue makes it seem effortless and memorable. It will be surprising, insightful, and original. And it will reveal the unique voice of its characters. These qualities are easy enough to describe, but much harder to produce. For most writers, creating effective dialogue is a by-product of the character development process.
But when done right, it produces dialogue that only the one character could have spoken, these are the lines that can live for decades.
There are many ways in which you can classify an audience. The simple demographics to classify an audience is their location, gender, race, sexuality, religion, age, and occupation. An audience is commonly classified by class, which is normally determined by wage and occupation. This way, companies can aim their product at specific groups of people.
Companies also look at physiographics to define and categorise an audience. This looks more at their personality and interests, as well as to work out what they are more inclined to want to buy and how advertising would effect them and make them more likely to buy a product.
Now there is The LifeMatrix model. This categorises an audience into 10 different, more specific types. This now is not just about class, but now more about age, interests, and attitudes. Using the LifeMatrix model makes it easier for a company to aim a product at an specific audience.
Based on a young girl who gets kidnapped by a couple in the cold morning of october 11th 2020.
First draft:
March 20, 2020
Characters:
Luke – kidnapper 1
Sofia – kidnapper 2
Jasmine – Young girl (main character)
Giulia – Jasmine’s mother
The scene begins with Luke and Sofia getting ready to commence the kidnap by putting on their ski masks (medium shot from behind). Then they start driving the car (medium shot from in front). Opera music plays in the background and then gradually softens when they start their dialogue, which they turn off from the radio. The lighting is chiaroscuro-(harsh lighting on side of face as they look at eachother)
Slowly zoom in to Lukes face
Luke:
“Are you ready babe?”
(Pan movement)to show sofia laughing – nodding and evil laugh
Car moves under a street lamp, lighting from above shines on their face as they slip on their skii mask.
Jasmine is walking towards her home (long shot as she walks). When the camera introduces her identity (medium shot showing her listening to music through headphones).
Luke and Sofia get out of the car and start walking until they find Jasmine. When they do they start following her (Medium shot of them from behind and jasmine in the middle of the frame – tracking shot)
As the couple gets closer to Jasmine they surprise her on the spot (close up of them grabbing her from behind). (Handheld camera shots) to create stress of the couple dragging Jasmine into the boot of their car.
Jasmine:
“AHHHHHHH!”
Jasmine starts hysterically crying. As the couple throw her in the boot, Jasmine throws her house keys on the floor, which has a significant bear (close up to show that it has meaning).
Jasmine:
“Get off me!”
“Help!”
(Flash back) Giulia sitting on the sofa watching TV and realises it is getting late because Jasmine still hasn’t turned up so she starts calling her (jumps to a close up of the phone screen saying Mum calling – L cut from mum scene to jasmine in the back unable to pick up the phone). Giulia starts panicking and crying.
(Long shot of the garage corridor) establishing where Jasmine will be stuck and then when the couple and jasmine start going towards where she will be imprisoned (tracking and medium shot). (Flash back and long shot) of Giulia walking on the street (close up of her face) realising that she found Jasmine’s keys on the floor (close up of Giulia picking them up).
Scene ends with Jasmine tied up on a chair (medium shot which gradually pushes back into a long shot).
The opening scene of Breaking Bad is highly atmospheric. It has to be so because the series is a long one, with a lot of different plots, and so the viewer must be engaged from the outset.
In the opening scene we see a rocky desert set against a stunning blue sky. The only diegetic sounds are bird noises and insects. The craggy rock formations are filmed from the shady side giving them a look that is a little bit spooky, but there is nothing else that gives any indication of anything bad about to happen. It is ominous.
Next the camera pans to a beautiful blue sky, peaceful and calm. At the very same moment, some background music fades in quietly, and at the same time an item of clothing comes into the frame. The first indication of anything unusual is the pair of trousers that start to gently tumble in the desert breeze, and as they fall closer to the ground they turn upside down and fill with air, inflating the trousers which then parachute quite comically down to the ground. They land on the ground and immediately crumple as the air is knocked out of the on impact. The non-diegetic sound has become louder now. There is a dark humour to this scene which is representative of the series, staged around an intense world of drugs and violence weaved into the lives of normal people.
The scene is set. We are in a desert. But something is about to happen that is unexpected. Suddenly an engine sound comes into the shot. At the same point a vehicle drives right over the trousers that are lying crumpled on the ground. The music changes completely at this point. Chaos becomes apparent. The wheels of a large mobile home have driven over the clothing and the vehicle is in full view as it races through the desert, again quite a comical scene.The shot switches to the inside of the mobile home. A panicked driver is at the wheel driving erratically through the desert. Next to him in the passenger seat is an unconscious person. The angle switches to show that both of these people are wearing gas masks. The indication is that something dangerous is taking place. The panic of the driver is very clear as the handheld camera switches from one shot to the next, allowing the viewer to absorb what is happening. Along with the noise of an engine driving fast, there are crashes and bangs, along with which the camera pans from the driver who glances around, to the rear of the truck which shows the origin of the noises as bottles and equipment and other unidentified things smash inside the vehicle. There is also another person, lying face down, sliding across the floor of the truck, and we assume he is dead as this man is not wearing a gas mask. The shot switches from close of WW´s face, breathing heavily and sounding scared, with his gas mask steaming up as he tries to see and to control the truck, to the outside in the desert showing the huge vehicle careering dangerously through the desert scrub, swerving from side to side until it finally comes to a crashing halt amidst clouds of dust in the rocky sand. There is a khaki green shirt hanging on a coat hanger which is still attached to the wing mirror of the truck.The only sounds now are the creaking and smashing of the things inside the vehicle. With the camera on the truck crash site, there is a brief moment to absorb the halt of the vehicle.
And then as quickly as the camera moves to the side door of the truck, a boot heavily kicks the door open and out runs our main character Walter White, stumbling forward in his underpants as he grapples to remove his gas mask and get some air. The camera pans away to show him next to the crashed truc where he throws his hands in the air and curses as the enormity of what has just happened sinks in. No music is needed. It is a comical scene, no music is used, just the sounds of the desert, WW cursing,……..and the sound of a police siren fading in! Panic! What should he do? He holds his head in his hands to help him focus. The truck is full of illegal equipment and there is an unconscious passenger in a gas mask slumped on the passenger seat. WW reaches for the hanging shirt and puts it on. Still in his big white underpants and brown boots, he buttons his shirt in a vain attempt to make himself look more respectable, and as he does so, his mind racing, he winces at something that he remembers. He rushes back inside the truck. Inside he goes straight to the dead man on the floor and prises a pistol out of his hand. Still there is no additional sound. The noise of WW holding his breath, stuffing the pistol in his underpants, rushing to collect a video camera from the glove compartment, and running gasping for air back outside to the desert where the sound of the police siren tells us that the police are coming closer. He grapples with the video camera. The camera again gives us a clue to the era in which the movie is set, aas it is a fairly bulky hand held object that is less common to see nowadays. The camera pans away to remind the viewer of the enormity of his situation. In a deserted location, next to a huge crashed truck and wearing only boots and underpants, WW is desperate, and although it is quite comical, it is also very clear that he is in a terrifying situatioñn. Close up to his face. WW is shot close up as he ruffles his hair and tries to compose himself. He is holding the video camera close up to his face and is about to record himself. The side angle of him starting to speak, taking breaths and attempting to stay calm, show his pained face, the fear that he experiences. He states his full name and his full address. This indicates to the viewer that this is a man who has arrived in a chaotic and potentially criminal situation, but who is not an individual who would normally be this way. He is a respectable citizen in a shocking situation, and a glance into his perspective and his feelings is emphasised as the shot changes to an image of WW from the video camera itself as he starts to speak, addressing the law enforcement agencies. The police sirens come closer.